smurfier's avatar

smurfier

John
127 Watchers21 Deviations
125.8K
Pageviews


Wifi and Battery meters are a staple of laptop users and are incredibly easy to create.

ImageCrop, ImageTint, and all of the other Image related features are a very useful feature of Rainmeter opening a whole new method of creating dynamic images. We're also going to use some neat tricks with DyanamicVariables, Substitution, and Conditional Statements to make the battery indicator change color and blink when the battery is low.

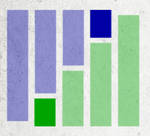
Below is our example skin.


Note: The big reason we're using ImageCrop instead of a Bar meter is that when using an Image with a Bar meter, the Image cannot be scaled.

We need to start by grabbing the image we're going to use.


It's grey because we're going to use ImageTint to change it's color in Rainmeter.

Lets start our code by setting up the basics and some Variables that we're going to use later on.

[Variables]

OrigHW is the original Height/Width of the image. We're using a 100x100 image so we only need to define one variable here.

OrigHW=100

Sections defines the number of sections in the image.

Sections=4

SectionsW is the width of the individual sections. For the purpose of this tutorial this Variable is in the form of a formula.

SectionsW= (#OrigHW#/#Sections#)

HW defines the scaled Height/Width of the individual indicators. Once again, we only need one variable since our image is a square.

HW=50

Now we need to define the colors that we want to use.

BatteryBack=0,0,255,100
BatteryIndic=0,0,255,255
Battery50=255,255,0,255
Battery25=225,0,0,255
WifiBack=0,255,0,100
WifiIndic=0,255,0,255


Now we're going to work on the Wifi meter since it's the more basic code.

First we need to define the measure for the WiFi status.

[msWifi]
Measure= Plugin
Plugin= PluginsWiFiStatus.dll
WiFiInfoType=Quality


Now is the fun part. We need to determine the width of the indicator.

[cWifi]
Measure=Calc
Formula=ROUND(msWifi/(100/#Sections#))*#SectionsW#


ROUND will round the our value to the nearest whole number. If you want to round up use CEIL, or you can use FLOOR to round down.

Note: If you want to use a bar meter instead of using ImageCrop, use this formula instead: (CurrentValue/MaxValue)*OriginalDimension

Now let's define the background image.

[mBack]
Meter=Image
ImageName=Back.png
ImageTint=#WifiBack#
AntiAlias=1


Don't forget to make it the Height and Width of the variable we made earlier.

H=#HW#
W=#HW#


We are moving the wifi meter one section to the right, and just a little bit down to make room for the battery indicator.

X= (#HW#*0.25)
Y= (#HW#*0.05)


Now we'll create the actual WiFi indicator.

[mStat]
Meter=Image
ImageName=Back.png
ImageTint=#WifiIndic#
AntiAlias=1
X=r
Y=r
DynamicVariables=1


At this point the image is still it's original dimensions.

ImageCrop=0,0,[cWifi],#OrigHW#

What this means: Start at the top, left and crop out a box that is [cWifi] wide and #OrigHW# tall.

Now to scale it to the height and width we defined earlier.

H=#HW#

Since Scaling is done last, we have to now scale the cropped image to the new width. Take the width of the cropped image, divide it by the original width to create a ratio or percent, and multiply it by the new width.

W= (#HW#*([cWifi]/#OrigHW#))

That's it. We have a working WiFi meter. Now let's work on the battery meter.

Just like with the WiFi we have to measure the Battery.

[msPower]
Measure= Plugin
Plugin= PluginsPowerPlugin.dll
PowerState= Percent


The same thing as before.

[cPower]
Measure=Calc
Formula=ROUND(msPower/(100/#Sections#))*#SectionsW#


Another background image.

[mBack2]
Meter=Image
ImageName=Back.png
ImageTint=#BatteryBack#
H=#HW#
W=#HW#
AntiAlias=1


We're using the same image so we need to flip it around a bit.

ImageFlip=Both

Here's the part where we change the color of the battery indicator based on the percent.

[BatteryColor]
Measure=Calc
Formula=msPower>=50?-1: (msPower<25?-3:-2)


Now we turn those values into colors using a substitute. We used negative numbers since they cannot exist in a color code.

Substitute="-1":"#BatteryIndic#","-2":"#Battery50#","-3":"#Battery25#"

Just to make things nifty lets have the indicator blink if the power is less than 25.

[BatteryBlink]
Measure=Calc


Conditional statements evaluate to 1 (true) or 0 (false) so we can actually use them in calculations.

Formula= (msPower<25)*(1-BatteryBlink)

Now let's use our measures to put together the battery indicator.

[mStat2]
Meter=Image
ImageName=Back.png
ImageTint=[BatteryColor]
ImageFlip=Both
AntiAlias=1
DynamicVariables=1


Nothing really different here.

ImageCrop=0,0,[cPower],#OrigHW#
W= (#HW#*([cPower]/#OrigHW#))
H=#HW#


Since we flipped our image around we need to move our flipped, cropped and scaled indicator into the correct position.

Take the width of the cropped image (before it's scaled) divide it by the original width to get what ratio it is compared to the whole image. What we need is the ratio of what we're not using so we take 1 and subtract that ratio we just calculated and multiply that by the new width.

X= (#HW#*(1-[cPower]/#OrigHW#))
Y=r


Here's where we use the measure we made to make the indicator blink.

Hidden=[BatteryBlink]


Join the community to add your comment. Already a deviant? Log In
Welcome to the latest Rainmeter Workshop! Today we are going to make a skin for performing internet searches using a variety of search engine options. Our example skin is below.


As always, our first step is to create our [Rainmeter] section.

[Rainmeter]
Update=-1


Since our skin relies on user input, there's no need to have it update on a regular interval. Setting the update to -1 tells the skin to update once, and only once.

Next up is the [Variables] section. We need to create a variable to use later on so we know which one of our search engine we are going to be using. This will also make it easier to create an indicator so the user knows which search engine is selected.

[Variables]
Search=1


Might as well use a variable name we can't forget.

Now on to a much more complicated bit, the InputText plugin.

[InputText]
Measure=Plugin
Plugin=InputText
Command1=["https://www.google.com/search?q=$UserInput$"]
Command2=["http://www.bing.com/search?q=$UserInput$"]
Command3=["http://en.wikipedia.org/w/index.php?search=$UserInput$&title=Special%3ASearch"]
Command4=["http://www.imdb.com/find?q=$UserInput$&s=all"]
Command5=["https://www.google.com/search?sitesearch=docs.rainmeter.net&q=$UserInput$"]


For those of you at home following along with the example skin, we're skipping the formatting right now.

Each Command line applies to one our search engines. Where we need the search query to go is where we place $UserInput$. That is where the plugin will place what we type in before executing the command.

The Command number applies to the Search variable we created in the previous step. That is how we are keeping track of which search engine is which.

Now it's time to star with the meters. Since they are displayed in the order they are placed in the skin file then we need to start with the background.

[Background]
Meter=Image
H=55
W=200
SolidColor=50,50,50,255


Now that we have a background we need to start adding the bits that function. The first being the meter we click on to bring up the text input.

[Text]
Meter=Image
H=20
W=([Background:W]-10)
DynamicVariables=1
X=5
Y=5
SolidColor=0,0,0,255
MouseActionCursorName=Text
LeftMouseUpAction=!CommandMeasure InputText "ExecuteBatch #Search#"


We did a little trick up there when defining the width. Since then width of the text option relies on the width of the background we can have Rainmeter do the math for us via the use of Section Variables.

The next bit that should pop out is that MouseActionCurorName bit. By setting it to Text we make it so that the cursor will change to show the user the Text cursor and they will know that is where they need to click.

Right below that is our mouse action. Once again our Search variable comes into play. Not much to see here so we're going to move along.

Now is a good time to go back and add our formatting to the InputText plugin. We just take the H, W, X, Y, and SolidColor from our Text section, add a FontColor, FontSize, and FontFace and we now have what is below for our [InputText] section.

[InputText]
Measure=Plugin
Plugin=InputText
H=20
W=190
X=5
Y=5
SolidColor=0,0,0,255
FontFace=Calibri
FontSize=11
FontColor=255,255,255,255
Command1=["https://www.google.com/search?q=$UserInput$"]
Command2=["http://www.bing.com/search?q=$UserInput$"]
Command3=["http://en.wikipedia.org/w/index.php?search=$UserInput$&title=Special%3ASearch"]
Command4=["http://www.imdb.com/find?q=$UserInput$&s=all"]
Command5=["https://www.google.com/search?sitesearch=docs.rainmeter.net&q=$UserInput$"]


Notice that we didn't use the formula for the W. This is our other option if the formula is not your cup of tea. If you end up using the formula, don't forget to add DynamicVariables=1.

For our next trick we are going to add an indicator so the user knows which search engine is currently selected.

[Indicator]
Meter=Image
H=5
W=15
Y=45
X=(5+(#Search#-1)*20)
SolidColor= 50,50,255,255


That formula is the fun bit. Start at X=5 and add 20 for the Search number minus 1. We subtract 1 from the Search number because for the first Search number we do not want to add 20.

Now we need to start work on giving our search engine some icons. First off is the MeterStyle so we can skip some code later on.

[Icons]
Path=#@#
AntiAlias=1
MouseActionCursor=0
H=15
W=15
Y=r
X=5R
LeftMouseUpAction=[!WriteKeyValue Variables Search #CURRENTSECTION#][!Refresh]


By using the Path property we don't need to set it in the ImageName property of every meter. We're going to use the resources folder for this. Rainmeter does not scan this folder to look for skins.

If we name the sections properly for the icons we can use #CURRENTSECTION# and put the mouse action in the MeterStyle. We are using !WriteKeyValue to write the value of the icon we click on to the Search variable. We could also use !SetVariable but we want the value to be saved when we refresh the skin.

Now one to the icons themselves. A good place to find icons is iconfinder.com

Each icon needs to have a section name cooresponding to it's Command number in the InputText measure.

[1]
Meter=Image
MeterStyle=Icons
ImageName=Google.png
ToolTipText=Search Google
Y=30
X=5


We need to properly place the first icon, all the others will be relative positioned based on it.

From then on we just keep adding icons. After the first it gets a little bit easier as you can see.

[2]
Meter=Image
MeterStyle=Icons
ImageName=Bing.png
ToolTipText=Search Bing


And there you have it. It isn't difficult to add as many search engines you want with little effort.
Join the community to add your comment. Already a deviant? Log In
Featured

[Workshop] Laptop Status Indicator by smurfier, journal

[Workshop] EasySearch by smurfier, journal